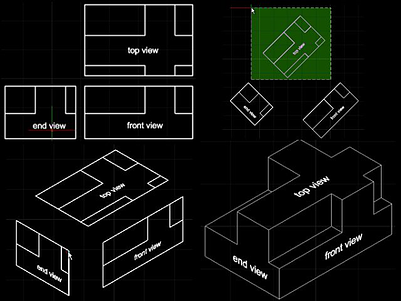
The following IntelliCAD end-user tip and trick is a 2-D construction technique that manipulates the top, front and end views with a series of rotations and non-uniform scaling factors so that the resulting geometry can be combined to give the appearance of a 3-D isometric drawing.

- You start with the 2-D drawings of each of the top, front and end views.
- You rotate the top view in a counterclockwise direction of +45°.
- You repeat a similar rotation of +45° for the front view.
- The end view is however rotated in a clockwise direction of -45°.
- You then turn each of the views into a block by using the block command. Give each block a name corresponding to its view.
- Then insert the top view block with a Y scaling of 0.57735. Be sure to leave the X and Z scaling at one. Also ensure rotation is 0°.
- Then insert the front view block. This time the X scaling should be 0.57735 with the Y and Z scaling at one. Rotation for this block should be -30°. Place this block in the drawing below and to the right of the top view block.
- Insert the end view block. This also has an X scaling of 0.57735 with the Y and Z scaling at one, but the rotation is in a +30° direction. Insert this to the left and below the top view.
- The blocks can now be snapped together and exploded to allow familiar 2-D modification techniques to trim and add lines as needed to give the desired 3-D isometric appearance.
If you are interested in purchasing IntelliCAD you can locate an appropriate IntelliCAD technology consortium member via the following website members.IntelliCAD.org/members.
If you're interested in becoming a member of the consortium please contact us via twitter @IntelliCAD or via email ITCsales@IntelliCAD.org
